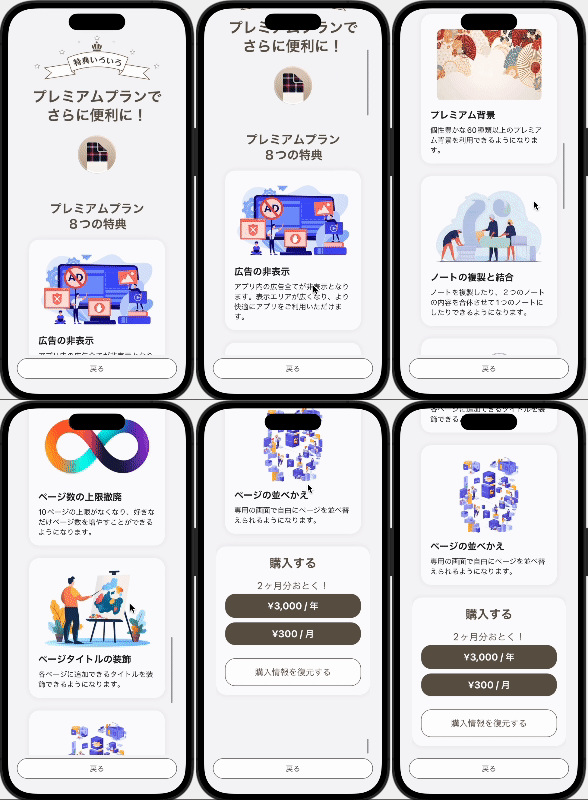
SwiftUIでサブスクの購入画面を組み上げてみたので、どうやってSwiftUIで作っていくのかを解説します。
SwiftUIの解説のみで、課金処理自体には触れないのでご注意ください。
開発環境はXCode14.2
アプリの対象OSは、iOS14以上
となります。
デザインはどう決める?
僕は生粋の開発者で、デザインはゼロから考えてもダサいものしか生み出せないので、世間に溢れているものの中で自分が好きな物を参考にしていつも作っていきます。
今回は課金画面なので、シンプルで信頼がありそうな、そして上質でオシャレな感じにしたかったので、それに当てはまるApple Storeを参考にしました。

見出しの感じとか、丸みの感じとかをマジマジと見ておきます。必要があれば色もスポイトツールで吸い上げておきます。
全体の構成
UIの全体の構成は
SwiftUIの全体構成
SwiftUIの全体構成はこんな感じになります。
VStackでViewをただ積んでいるだけだけど、サブスクの課金特典が長いのでScrollViewで囲んでおきつつ、戻るボタンは常に下に固定しておきたいので、ScrollViewから外しています。
ZStack() {
  Color().ignoresSafeArea()  // 背景色を決める

  VStack() {
    ScrollView {
      // 大見出し

      // サブスクの特典紹介

      // 課金メニュー
    }

    Space()

    // 戻るボタン
  }
}
大見出し
大見出しは画像と文字をVStackで並べてるだけです。

画面全体をVStackで囲んでいるのでこれだけです。
Image("premiumtitletop")

Text("**プレミアムプランで\nさらに便利に!**")
  .multilineTextAlignment(.center)
  .font(.largeTitle)
  .foregroundColor(ColorBrown)

Image("premiumtitlebottom")
  .padding(.bottom, 50)
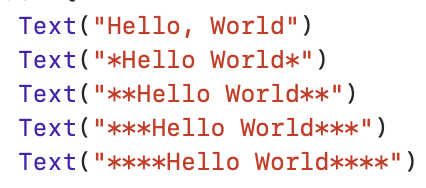
ただ、重要なポイントが1つだけあって、Textの文字列が「**」で挟まれている部分です。
Textにboldを適用するには「fontWeight」や「bold」というモディファイヤが用意されているのですが、iOS16以上からなので、昔から運用しているアプリだとiOS16未満の人を切るのは厳しく…。
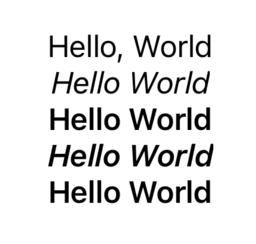
調べて見た所、16未満でも「*」で囲めばboldになることが分かりました。
実行結果は以下の通り。奇数だとイタリックになるみたいですね。
サブスクの特典紹介
本記事のメインです。というかこれについて書きたくて記事を起こしました。

ForEachで同じセルを8つ並べているだけですが、1つのセルはこんな構造になっています。
VStack(spacing: 0) {
    Image("midashiImage")
        .padding(.top, 10)

    Text("タイトル")
        .foregroundColor(ColorBlack)
        .font(.title2)
        .fontWeight(.bold)
        .frame(width:260, alignment: .leading)
        .padding(.bottom, 10)

    Text("詳細")
        .foregroundColor(ColorBlack)
        .font(.body)
        .frame(width:260, alignment: .leading)
        .padding(.bottom, 20)
}
.frame(width:300)
.background(ColorWhite)
.cornerRadius(22)
.shadow(color: Color.black.opacity(0.05), radius: 5)
.padding(.bottom, 20)
VStackで画像とタイトル、詳細を囲みつつ、VStackに装飾モディファイヤをモチャモチャっとセットすることで横幅固定、高さ可変の美しいApple Store風セルが完成しちゃいます。
こんなシンプルなコードだけでオリジナルの美しいセルが作れて、ちょっとSwiftUI見直しちゃいました。
繊細に作り上げたい時は、VStackのspacingに0を指定して、挟んだ要素の方で細かくpaddingを指定すると思い通りにキマりますね。
繊細なドロップシャドーを掛けるために透明度を調整したい場合は、こんな感じに記述するようです。
.shadow(color: Color.black.opacity(0.05), radius: 5)
画像素材はfreepikの有料素材を使っています。サブスク契約していますが高品質な素材が沢山あって使い勝手が良いです。
https://www.freepik.com/
課金メニュー、戻るボタン
課金メニューは「サブスクの特典一覧」で編み出したセルと同じ構造です。便利。

VStack(spacing: 0) {
    Text("**購入する**")
        .foregroundColor(ColorBrown)
        .font(.title)
        .padding(.top, 20)
        .padding(.bottom, 20)

    Text("2ヶ月分おとく!")
        .foregroundColor(ColorBrown)
        .font(.title2)
        .padding(.bottom, 5)

    // 年課金
    Button (action:{
        purchaseAnnual()
    })
    {
        Text("¥3,000 / 年")
            .font(.title2)
            .frame(width: 300)
            .padding(10)
    }
    .frame(width: 300)
    .frame(minHeight: 53)
    .foregroundColor(ColorWhite)
    .background(ColorBrown)
    .opacity(alphaAnnualBtn)
    .cornerRadius(22)
    .padding(.bottom, 10)
    .disabled(!enabledAnnualBtn)


    // 月課金
    Button (action:{
        purchaseMonthly()
    })
    {
        Text("¥300 / 月")
            .font(.title2)
            .frame(width: 300)
            .padding(10)
    }
    .frame(width: 300)
    .frame(minHeight: 50)
    .foregroundColor(ColorWhite)
    .background(ColorBrown)
    .opacity(alphaMonthlyBtn)
    .cornerRadius(22)
    .padding(.bottom, 30)
    .disabled(!enabledMonthlyBtn)


    // 復元ボタン
    Button (action:{
        restore()
    })
    {
        Text("購入情報を復元する")
            .font(.title3)
            .frame(width: 300, height: 60)
    }
    .frame(width: 300, height: 60)
    .foregroundColor(ColorBrown)
    .background(Color.white)
    .opacity(alphaRestoreBtn)
    .cornerRadius(22)
    .overlay(
        RoundedRectangle(cornerRadius: 22)
            .stroke(ColorBrown, lineWidth: 1.0)
    )
    .padding(.bottom, 20)
    .disabled(!enabledRestoreBtn)

}
.frame(width:340)
.background(ColorWhite)
.cornerRadius(22)
.shadow(color: Color.black.opacity(0.05), radius: 5)
.padding(.bottom, 30)
戻るボタンは下に固定しておきたいのでScrollView { } から外して置いている、という事以外特に特筆することはありません。

// 戻るボタン
Button (action:{
    presentationMode.wrappedValue.dismiss()
})
{
    Text("戻る")
        .frame(width: SCREEN_WIDTH-40, height: 44)
}
.frame(width: SCREEN_WIDTH-40, height: 44)
.foregroundColor(ColorDarkGlay)
.background(Color.white)
.cornerRadius(22)
.overlay(
    RoundedRectangle(cornerRadius: 22)
        .stroke(ColorDarkGlay, lineWidth: 1.0)
)
(オマケ) Objective-CにSwiftUIを表示する
ちょっとマニアックな話かもしれませんが。
このSwiftUIの画面を乗せるアプリは10年以上運用していて、Objective-Cで作っている画面が多く、今回作ったSwiftUIの課金画面もObjective-Cで作ったUIViewControllerから呼び出します。
しかしObjective-CからSwiftUIを直接呼び出すことが出来ないので、どうすれば表示できるのか、方法を残しておきます。
まずは、Swiftで作ったクラスで、SwiftUIの画面 (PlanView)をUIHostingControllerでラッピングする関数を用意します。
今回はUtilというクラスのクラス関数としています。
static func createPlanView() -> UIViewController {
  return UIHostingController(rootView: PlanView())
}
そして、Objective-CからSwiftは普通に呼べるので、上記の関数からUIViewControllerとして受け取ってpushすればOKです。
#import "Quickmemo-Swift.h"

// ......

UIViewController* planViewController = [Util createPlanView];
[self.navigationController pushViewController:planViewController animated:YES];
いつかObjective-Cがオワル日に備えて、Swiftへのリプレイスを進めないといけないかもしれませんね…。
よろしければコチラの記事もドウゾ
